
How to migrate Email from Mac Outlook to Windows Outlook
We’ll go over both the time-consuming and error-prone manual method of moving Outlook emails from Mac to Windows and the quick and painless procedure of using an OLM converter tool to convert Mac data files to Outlook data file using olm to pst converter
What’s the Deal with Converting Outlook for Mac to Outlook for Windows?
The following are two examples of when a Mac user would want to export outlook mac to windows their data to the Windows Outlook PST format:
1. Users require to access the emails of Mac Outlook to Windows Outlook
2. must transfer information from Mac to Windows PC.
To our knowledge, we cannot open OLM files in Outlook for Windows. If we want to read Outlook emails on a Mac, we’ll need to convert the files to a different format.
Methods for Manually Converting Mac Outlook to Windows
1. Transfer Outlook to OLM File
1. Open Outlook on your Mac, click the Tools menu and select the Export option.
2. In the Export to Archive File (.olm) Window, choose the content you wish to export and click Continue.
3. In the resulting “Save archive file (.olm) as” dialogue box, give your file its last name and specify its storage location.
4. After you’ve finished exporting your data, click Finish.
Will overwrite the current path with an archived. Olm file containing all the chosen objects.
2. Setting Up Gmail in Mac Outlook
1. Upon launching Outlook for Mac, select the Outlook menu and then the Preferences submenu.
2. A window labelled “Outlook Preferences” will pop up; from there, select “Account” under “Personal Settings.”
3. Select Email from the drop-down menu that appears after clicking the + sign in the bottom-left corner of the Account window.
4. After you’ve entered your information, click the “Add Account” button.
5. Will link your Outlook account to the selected Gmail account.
3. Transfer information from Microsoft Outlook for Mac to Gmail
1. Create a new Gmail folder in Outlook for Mac by right-clicking on the Folder and choosing “New Folder.”
2. Give the directory a new name, then go to the tool tab and pick the Import option.
3. Then, right-click the items in the Folder you wish to export from your mailbox and select Move > Choose Folder.
4. Then, right-click the Folder’s contents and select Move > Choose Folder.
5. Select the appropriate Gmail folder and then copy
The new Gmail folder goes all the information from the chosen OLM files.
4. Convert Gmail’s OLM files to Outlook’s PST format
1. First, open Outlook for Windows and add the same Gmail account you added to Outlook for Mac.
2. Select File > Open & Export > Import/Export 2.
3. Under the Import and Export Wizard, choose the option to Export to a File.
4. Select the.pst file format for your Outlook data and click Next.
5. Next, choose the Gmail folder where you’ve stored your OLM file and click the Export Outlook Data file button.
6. Afterward, select the Folder you want to store your Outlook data in (.pst) and click Finish.
It looks like you were able to complete your transfer without any problems.
The Drawbacks of the Manual Process
The following are some of the drawbacks to using the technique above to transfer emails from a Mac to Windows:
1. Always insist on setting up your Email with Gmail.
2. The manual process is laborious and time-consuming.
3. It may use some help from the technical side.
4. Cause inconsistencies in the data.
Ways to Avoid These Repercussions of Doing Things by the Manual Process
Adhering to the expert method can avoid the negative effects of using a manual approach.
Instruction for using third party tool for converting OLM to PST
1. This is the home screen of Stellar Converter for OLM, the software provides two options to select the mailbox (OLM) you want to “Browse” or “locate the olm file”.

2. The software will start scanning the selected mailbox.

3. Preview of Outlook for Mac OLM file mailbox components to be converted.

4. Save your converted OLM file in your desired format – PST, MSG or EML.

5. You can save the converted OLM file as a new Outlook PST file or add it to your existing Outlook profile.
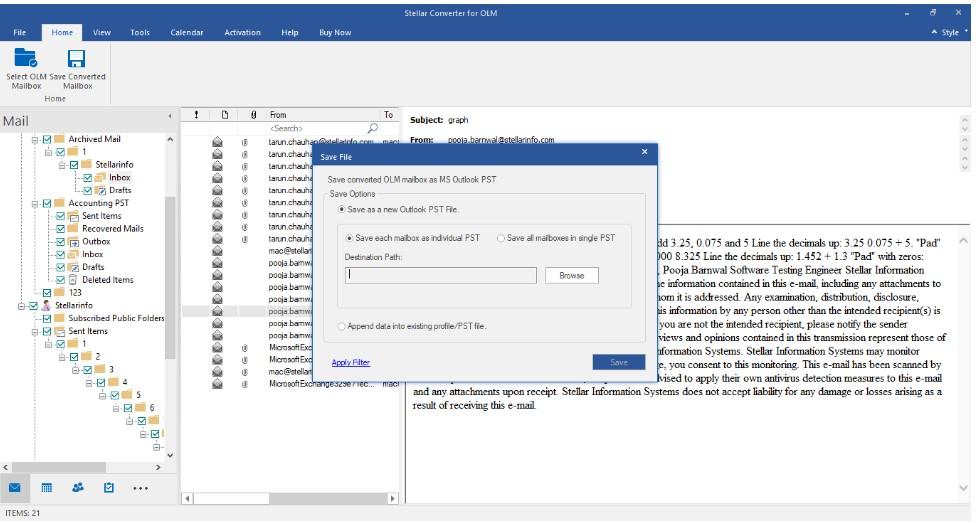
6. The software saves the converted PST file.

7. The selected mailbox has been saved at your desired location.

Conclusion
Hope you got a clear idea of outlook mac export pst. We are now aware of the drawbacks of using a manual method and know how to address them. Also, get familiar with the straightforward automated tool that requires no additional work when transferring Outlook emails from Mac to Windows.

